192.168.1.250 – Netgear Extender Default IP
192.168.1.250 is the Netgear extender default IP used to log in to your extender and set it up. To log in to your Netgear WiFi range extender, you just need to access a web browser and enter this IP in the URL bar. Doing so will take you to the default Netgear extender login web page. From here, you can install and
configure your Netgear WiFi range extender in a hassle-free manner.
The Netgear default IP 192.168.1.250 lies between the range of 192.168.1.1 – 192.168.1.255. This range is known as the Class C IP range. This IP address falls in the category of private IP address that follows the RFC 1918 standards. It is worth notable that users can access this IP address only within a private network,
not in the public network.
Here, you will get to know how to access https://192.168.1.250 admin panel for your WiFi range extender. Let’s get started.
192.168.1.250 Login Steps
In order to access the 192.168.1.250 admin login web page, consider the following steps:
- Turn on your Netgear WiFi range extender.
- Launch a web browser on your computer.
- Type http://192.168.1.250 in the address bar.
- Press the Enter key.
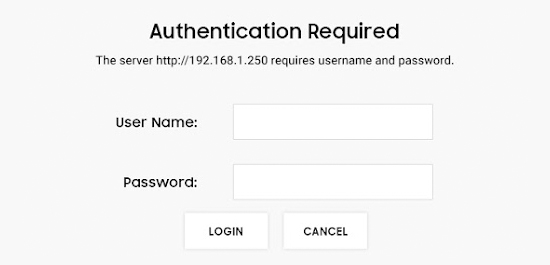
- You will see the default Netgear WiFi range extender login window.
- Here, you need to enter the user ID and passphrase.
- Once done, hit Log In.
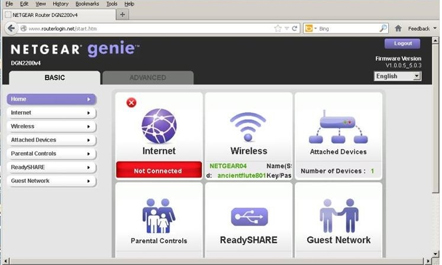
Now, you will get redirected to the Netgear admin panel. Here, you will be able to access the smart setup wizard to set up and configure your extender’s settings. In case you find any difficulty while accessing the Netgear extender default IP, reach out to our highly-experienced technicians via chat
Quick Tip: Basically, the default IP 192.168.1.250 is an alternative to mywifiext.net web address. If the web address doesn’t work, use this IP for Netgear extender login.
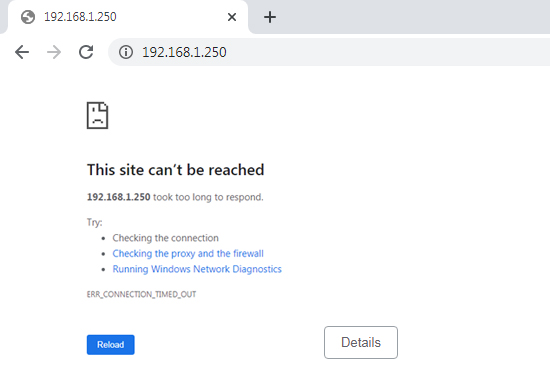
Can’t Connect to 192.168.1.250?
Are you seeing ‘192.168.1.250 takes too long to respond’ or ‘the site can’t be reached’ error while accessing the Netgear extender default IP? We have got your back! Here are a few proven troubleshooting tips which help you fix the ‘can’t connect to 192.168.1.250’ issue with ease:
- Make sure that you are accessing a high-speed internet connection on your computer.
- Cross-check if you entered the correct default IP in the URL bar. There should not be any typos.
- Run a scan on your computer to find and remove viruses, malware, and other junk files.
- Check the cable connections between your extender and router. In case there is any damaged cable, replace it with a new one.
- Delete cache, cookies, as well as browsing history from the web browser you use for 192.168.1.250 login.
- Try using another web browser.
Still facing the same issue? Get in touch with our experts right away!
Advanced Settings You Can Configure Using 192.168.1.250 Admin Login
Once you are on the 192.168.1.250 admin login panel, you can not only perform the Netgear extender setup but you are also able to access the advanced settings of your extender. Here is a list of the advanced settings you can configure after logging into the Netgear extender default IP:
- Keep an eye on the devices that are connected to your WiFi network
- Enable or disable WiFi radio
- Change the Netgear extender password
- View and change WiFi settings
- Set up an access schedule
- Create a guest WiFi network
- Customize the WiFi extender’s coverage area
- Update the extender’s firmware
- Change the WiFi network name or SSID
- Allow or deny WiFi access to a particular device
- Create a hidden network
Access Netgear Genie Smart Setup Wizard with 192.168.1.250
You can also access the Netgear genie smart setup wizard using the 192.168.1.250 IP. The genie wizard is known as the Netgear installation assistant that provides you on-screen instructions to set up your WiFi range extender. In order to access the Netgear genie setup wizard, follow the steps mentioned below:
- Load an internet browser on your PC or laptop.
- In the URL bar at the top-left side, type http://192.168.1.250.
- Hit Enter key.
- The Netgear WiFi range extender login window appears.
- Input the username and password into the given fields.
- Click on the Log In button on the bottom side.
- Once logged in, you will see the Netgear genie setup.
The genie setup wizard will provide you the following steps to set up your extender:
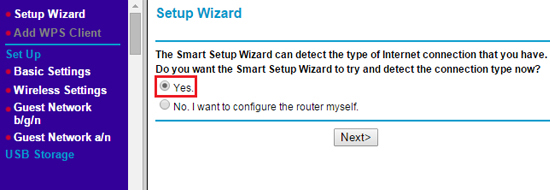
- Click on the Next button.
- Wait for some time as the genie identifies the internet connection type.
- Select the network you wish to choose.
- Set up security settings for your network.
- At last, save the changes by hitting the Apply button.
That’s it! Thus, you can use the 192.168.1.250 (Netgear extender default IP) to access the genie setup wizard.
How to Change 192.168.1.250 Admin Login Password?
Every Netgear WiFi range extender comes with a default login password with which you can access its admin panel. However, it is recommended to change the default Netgear admin login password to something that is easy to remember for you but hard to guess for others. Here’s how to change 192.168.1.250 admin login password:
- Power on your computer or laptop.
- Pull up a web browser on it.
- Enter the IP address in the web browser’s address bar.
- Cross-check the entered IP address and hit Enter.
- Now, the dashboard of your extender displays.
- Navigate to the Wireless Settings section.
- Click on the Change Password option.
- Next, you will be asked to enter the old password and then the new password.
- After that, click on the Apply button.
In this way, you can change the 192.168.1.250 login password.