Netgear extender Setup | Netgear WiFi Extender Setup
People looking to expand the reach of their current WiFi usually opt for a range extender. And what can be better than choosing an extender by a brand like Netgear that helps users to make the most of their WiFi? Isn’t it? Netgear Extender Setup come in various sizes, shapes, and specifications. Right from the budget-friendly options to the pricey ones, you can invest in the one that best fits your WiFi needs.
No matter whether you want to use an extender for gaming or streaming, you first need to perform the Netgear extender setup to start using it. In this piece of writing, we will make you familiar with everything that you need to know about the Netgear extender setup. Let’s get started!
There are certain prerequisites to get the Netgear extender setup success. First, have the below-mentioned things handy, and then start with the setup process of your new extender.
Prerequisites for Netgear Extender Setup
- High-speed Internet
- An Ethernet Cable
- A WiFi Router
- Working Power Outlet
- Of Course, a WiFi Range Extender
Now, let’s take the plunge and help you make your Netgear WiFi range extender up and running by configuring it.
Netgear Extender Setup
Above all, you have to remember the requirements for an issue free extender setup. For the WiFi range extender arrangement, here are some fundamental prerequisites:
- Spot your WiFi extender in a same room as your home router.
- Make sure, the extender is getting the proper power supply or not.
- This is trailed by a serviceable home wifi network.
- It is constantly prescribed to introduce in excess of two internet browsers on your PC or laptop. A difficult circumstance may emerge when you neglect to sign in to the new Extender Setup page because of an internet browser issue. In such a circumstance, in the event that your PC or laptop has two browsers, at that point you can go with another browser.
So these were few essentials to keep in mind as a primary concern before installing a new range extender. Now, proceed with the setup instructions.
Netgear Extender Setup using Mywifiext
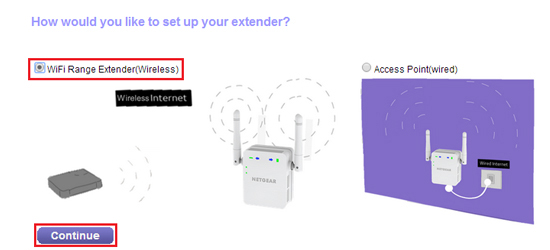
Netgear extender setup can be performed using various methods. If both your router and extender support the WPS button then better to execute the Netgear Extender Setup WPS method. Those who are not having WPS-supported devices can use the manual process to make their extender working. Have a nudge on the steps to do Netgear extender setup using the Netgear Installation Assistant method.
There are two methods to install a WiFi range extender:
- Manual method
- WPS method
How to Manually Configure Netgear Extender Setup
This strategy for Netgear Extender Setup is also called Web Browser Setup. Follow the rules given below to set your device with this method:
- Unpack your Netgear extender and attach the antennas.
- If no additional antennas are available for the extender model you have, proceed further.
- Power up your device by inserting its power socket into a working outlet.
- Now, using an Ethernet cable, connect your extender to the router or Access Point.
- Check the Power LED on your extender. It should be showing green.
- Now, turn on a computer or any device you have, and launch a web browser on it.
- To do the new extender setup, you need to enter the default Netgear extender setup website URL into the web address bar.
- Mywifiext.net is the address to be used.
- As soon as you press the Enter key after entering the web address, you will be directed to the Netgear extender login page.
- Enter the username and password of your extender and select the Login option.
- The New extender setup wizard will appear on your computer’s screen.
- Now, head towards the settings of your device and locate the list showing WiFi networks.
- Choose the WiFi network you are currently using from the list.
- You will then be guided by various on-screen instructions to complete the Netgear extender setup process.
- Follow the instructions till you are done with the set up of your new WiFi range extender.
Congratulations! You have effectively finished the new extender setup. Presently, you are free to put your extender anyplace you like.
Users are advised to follow all the aforementioned points in an accurate manner. Flaws in the execution of the setup process of the extender could push you to perform the Netgear extender setup reset and then again install the device.
Netgear Extender Setup through WPS Method:
WiFi protected setup or WPS is the easiest way to setup Netgear Extender. For this, all you need to do is to follow some easy steps given below:
- First of all, make sure that the extender is on.
- Search for the WPS button available on the device and press it. Push the provided WPS button on the existing router.
- The LED light will turn solid green in the condition of properly configuring the router’s extender.
- For the dual-band range extender, do again this progression.
- Finally, connect to Extender’s network and use the same passphrase as your router’s network.
- You can see the manual for the default username and password.
- Your Extender is ready. You, connect your WiFi devices and enjoy a seamless internet connection throughout the home or workplace.
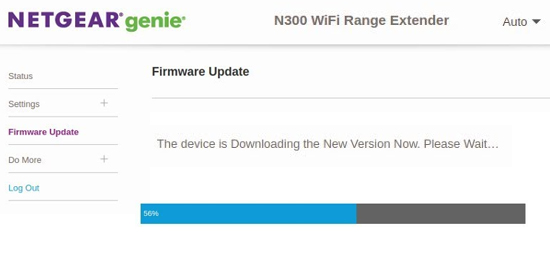
Netgear Extender Firmware Update:
If you have introduced a Netgear Extender so as to appreciate a quick WiFi signal, at that point it is your responsibility to screen the strength of your WiFi gadget. You have to update your firmware from time to time, giving your extender the gift of a healthy life. Keeping firmware updates will not only help increase your extender’s performance but will also help protect your network from various security threats.
Are you curious about the firmware update? Do you find updating the firmware a bit complicated? So now there isn’t anything to stress over. Since here, we will present you a few different ways by which you can refresh the firmware of your Netgear Extender.
The most recent firmware can be caught either through mywifiext or by utilizing a mechanized cycle. In the computerized cycle, you can get to the Netgear Genie arrangement to locate the most viable firmware refreshes for your Extender. The other path is to all the more likely control your WiFi go extender, utilizing www.mywifiext.net. Consequently, this strategy can help clients who are looking for some particular rendition of Netgear firmware for their extender. Read both methods carefully and follow the one which you find easy.
Technique 1: Update through Automated Procedure:
Here is a list of the most common new Netgear extender setup issues you may face:
- Access your gadget and open any internet browser.
- Log into your Netgear Extender utilizing 192.168.1.250.
- Navigate to the menu symbol and snap it. After that the Extender menu is visible on the screen.
- Now, go to Settings and afterward click on firmware update. (For some extender models, the ‘firmware update’ alternative will show up in the support area.)
- Now click on Check alternative. Tapping on it will show you the accessibility of new firmware for the Extender model you have submitted.
Technique 2: Update through Mywifiext :
- To utilize this technique, most importantly, you need to download the ideal firmware form from the official webpage of Netgear. In the inquiry choice by visiting the Netgear site, enter your current extender model. From this, you can check whether a firmware update is accessible for your WiFi gadget. In the event that accessible, download it.
- After downloading the ideal firmware for Extender, dispatch an internet browser on your gadget and access the new Extender Setup Wizard through mywifiext. The default web address will continue as before for all extender models.
- Now, go to Advanced then Admin, and afterward click on Netgear Firmware Update.
- Tap on the Choose File alternative and select the recently downloaded document.
- Upload the firmware by hitting on it. Once your extender gets a firmware update, your gadget will reboot naturally.
- After refreshing the firmware, you are encouraged to unplug your gadget and plug it in following a moment or two.
So it was a detailed process to setup Netgear Extender and update Netgear Extender Firmware. For more such information, you should check our posts regularly or write your questions in the comment box. We will attempt to address every one of your inquiries.
Points to Remember
While the process of a new extender setup is not rocket science, but there are certain points to keep in mind while installing the WiFi device. Let’s check them out.
- During the setup of the Netgear extender, keep the device closer to your WiFi router.
- Make use of an updated web browser to access the Netgear extender setup website setup page, i.e. mywifiext.net.
- Make sure all the wired connections of your extender and router are proper and finger-tight.
- Keep the extender away from devices emitting radio waves.
- Password-protect the extender after completing the setup process for securing it from unwanted threats.
- Keep the firmware of your extender and router always updated to get the best out of your WiFi device.
- Turn the device off when not in use.
Final Thoughts
Our guide on Netgear extender setup ends here. We hope that using the points given in the article, you would be able to make your Netgear extender operational without any hassle. Just in case you need more assistance on the Netgear extender setup process, feel free to send your query in the comments section.